API Documentation
VariPass API is simple and streamlined, allowing you to connect to it as easily as possible. The API is based around JSON, and comes down to sending and receiving JSON payloads. Additionally, the system allows you to connect to our WebSocket to receive update notifications live as they happen. This document explains all of the API features in detail.
Navigation:
- API Server
- Result Field
- Public Variables
- API Actions
- Create Variable
- Edit Variable Details
- Return Variable Info
- Delete Variable
- Move Variable Order Previous
- Move Variable Order Next
- List All Variables
- Read From Variable
- Simple Read From Variable
- Read Variable History
- Write To Variable
- Simple Write To Variable
- Toggle Boolean Variable
- Simple Toggle Boolean Variable
- Return All Data
- Return Latest Data
- Simple Return Latest Data
- Transfer Variable Ownership
- Render Variable Graph
- Simple Render Variable Graph
- Example API Client
- WebSocket Server
- Example WebSocket Client
- Demo API Client
API Server
API server URL:
https://api.varipass.orgAs we explained earlier, the API is based around exchanging JSON payloads, although it does support different types of transports as well. Our API server is located at the web address above, and the URL supports both HTTP and HTTPS connections. We would advise you to use HTTPS however, mostly for security reasons. You can submit requests to the API server in three different ways, mostly because there is no guarantee that all devices and softwares will support all HTTP request types. The following examples show how you would request to read a value of some variable.
An HTTP POST request with Content-type: application/json header requires the following as content of the request:
{
    "key": "l9VvtFztnilpPcfQ",
    "action": "read",
    "id": "4OpGXF48"
}
An HTTP POST request with Content-type: application/x-www-form-urlencoded header requires the following key-value pairs as form data:
key=l9VvtFztnilpPcfQ&action=read&id=4OpGXF48An HTTP GET request requires the following key-value pairs as GET parameters:
?key=l9VvtFztnilpPcfQ&action=read&id=4OpGXF48Every sent request will produce a response from the server. Most of the responses will arrive as another JSON payload, but they may also arrive in a simplified format if the correct API action is sent. We have created the simplified format in case it is too complex to parse the JSON response on a certain device or software. Note that all responses will return the result field which stores the result of the API request as a string which you can read. Below are examples for the two different response types.
JSON response:
{
    "result": "success",
    "value": 25.3,
    "time": 1485383174,
    "current": 1485383186
}
Simplified response:
success|25.3Result Field
The API stores the result of an API request in the result field. Most of the time, the result will simply be success, which means that the API request has been successfully executed. However, it can also return errors. Below is a list of all possible results.
successThe API request has been successfully executed.error_no_requestIn case you don't specify which API action you are requesting, this message will be returned.error_invalid_keySimilar to the above error, but it is fired if the specified API key doesn't exit. NOTE: This error may also pop up if your IP address has been banned from the API. If this happens, please contact us at support@varipass.org.error_invalid_actionIn case you request an API action that doesn't exist, this error will be returned.error_invalid_idMost of the API requests require you to specify the ID of the variable you wish to access. In case the variable doesn't belong to you or doesn't exist, you will see this error.error_invalid_parametersThis is returned if some parameters are missing from the API request. All API requests have a different set of parameters that have to be set.error_invalid_typeSome API requests require you to specify the variable type. In case you specify a variable that is not supported, this is returned.error_not_boolThe toggle API requests return this in case you try to toggle a variable which is not a boolean value.error_order_firstIn case you try to change the order of the variable to be previous, but it is already first, this error will be returned.error_order_lastIn case you try to change the order of the variable to be next, but it is already last, this error will be returned.error_lockedUsers can lock their variables to prevent from anyone tampering with their parameters and creating/deleting them. In that case, this error is returned.error_cooldownCooldowns are an important part of the API, as they help reduce the stress on our server. Please consult our FAQ for more info.error_max_variablesAll users have a maximum number of variables they can create. Please consult our FAQ for more info.error_user_not_foundThis error may only happen when transfering a variable to a different user. As the error string implies, it is returned when the target user doesn't exist.error_transfer_disabledThis error also happens when transfering a variable. In this case, the target user hasn't enabled transfering of variables to them.error_is_stringThis error will be returned when trying to draw a graph of a variable which is of the string type.error_invalid_formatThis error will be returned when drawing the graph and the format is incorrectly specified.error_unconfirmedThis error is returned when your account has just been made and hasn't been activated yet.error_bannedThis error is returned when your account has been banned.error_empty_variableYou should never see this error. It means there is something broken in the database. If it occurs, contact us immediately at support@varipass.org.error_dbSimilar like in above, this error should never happen. If it occurs, contact us immediately at support@varipass.org.
Public Variables
Variables may be set to public availability. A public variable can be read from without supplying any account API key, but still may not be written to by anyone other than the original owner using their API key. Public variables are however not listed anywhere so you must learn their ID from the original owner.
To set a variable as public, set the public parameter to true during the create or edit API actions, or simply check the relevant option on the Dashboard. To access a public variable, simply don't include the key parameter in the request's payload.
Only the following API actions may be used with public variables:
inforeadsreadhistorygraph
API Actions
This section deals with all of the different API actions you can request from our website. We are providing an example request and response payload for every action type, along with all parameters explained. For simplicity, all examples are using HTTP POST.
Standard request parameters:
keyYour API key.actionThe API action you are requesting.
Standard response parameters:
resultThe result of the API, as explained before.
The parameters above are standard and used in every API request, so they will not be mentioned again from this point.
create Create Variable
This action will create a new variable in your account. You can use it if you need to dynamically create them without using our Dashboard. This action cannot be requested if you lock your variables in your account settings.
Request example:
{
    "key": "l9VvtFztnilpPcfQ",
    "action": "create",
    "type": "float",
    "name": "Temperature",
    "description": "Temperature measured using a sensor.",
    "unit": "°C",
    "graph": true,
    "perc": true,
    "min": 20,
    "max": 40,
    "expire": 86400,
    "public": false
}
Required parameters:
typeThe type of the variable that will be created. Variable types include:int,float,boolandstring.nameThe name of the new variable.
Optional parameters:
descriptionThe description of the variable.unitMeasurement unit that will be shown next to the value on the Dashboard.graphWhether to draw the graph on the Dashboard.percWhether to show a percentage next to the value on the Dashboard.minThe minimum value of the variable. This is used to clamp the values in the Dashboard graph for this variable.maxThe maximum value of the variable. This is used to clamp the values in the Dashboard graph for this variable. When bothminandmaxare set to same values, no clamping will occur. These values are also responsible for correct calculation of the percentages whenpercis enabled.expireThe time needed for the variable to expire in seconds. Higher values will increase the cooldown time for writing to the variable. Please consult our FAQ for more info.publicWhether the variable is available to the public for reading.
Response example:
{
    "result": "success",
    "id": "4OpGXF48"
}
Parameters:
idConveniently, this API call will return the ID of the newly created variable. This can be useful if you want to instantly start writing to the new variable.
edit Edit Variable Details
This action will edit the details of a certain variable already present on your account. This action cannot be requested if you lock your variables in your account settings.
Request example:
{
    "key": "l9VvtFztnilpPcfQ",
    "action": "edit",
    "id": "4OpGXF48",
    "type": "int",
    "name": "Humidity",
    "description": "Humidity measured by the sensor.",
    "unit": "%",
    "graph": true,
    "perc": false,
    "min": 0,
    "max": 10,
    "expire": 86400,
    "public": false
}
Required parameters:
idThe ID of the variable.typeThe type of the variable. Variable types include:int,float,boolandstring. WARNING: Changing the type of the variable will erase all previous values stored in its history.nameThe name of the variable.
Optional parameters:
descriptionThe description of the variable.unitMeasurement unit that will be shown next to the value on the Dashboard.graphWhether to draw the graph on the Dashboard.percWhether to show a percentage next to the value on the Dashboard.minThe minimum value of the variable. This is used to clamp the values in the Dashboard graph for this variable.maxThe maximum value of the variable. This is used to clamp the values in the Dashboard graph for this variable. When bothminandmaxare set to same values, no clamping will occur. These values are also responsible for correct calculation of the percentages whenpercis enabled.expireThe time needed for the variable to expire in seconds. Higher values will increase the cooldown time for writing to the variable. Please consult our FAQ for more info. WARNING: Setting this to a lower value may erase some of the old data from variable's history.publicWhether the variable is available to the public for reading.
Response example:
{
    "result": "success"
}
info Return Variable Info
This action will return all variable's parameters that were set using the create or edit actions.
Request example:
{
    "key": "l9VvtFztnilpPcfQ",
    "action": "info",
    "id": "4OpGXF48"
}
Required parameters:
idThe ID of the variable to read details from.
Response example:
{
    "result": "success",
    "type": "int",
    "name": "Humidity",
    "description": "Humidity measured by the sensor.",
    "unit": "%",
    "graph": true,
    "perc": false,
    "min": 0,
    "max": 10,
    "expire": 86400,
    "cooldown": 60,
    "public": false
}
Parameters:
nameThe name of the variable.descriptionThe description of the variable.unitMeasurement unit that is shown next to the value on the Dashboard.graphWhether the graph is drawn on the Dashboard.percWhether a percentage is shown next to the value on the Dashboard.minThe minimum value of the variable. This is used to clamp the values in the Dashboard graph for this variable.maxThe maximum value of the variable. This is used to clamp the values in the Dashboard graph for this variable.expireThe time needed for the variable to expire in seconds.cooldownThe cooldown in seconds how often the variable can be written to. Please consult our FAQ for more info.publicWhether the variable is available to the public for reading.
delete Delete Variable
This action will irreversibly delete a variable from your account. This action cannot be requested if you lock your variables in your account settings.
Request example:
{
    "key": "l9VvtFztnilpPcfQ",
    "action": "delete",
    "id": "MzZE5Bwn"
}
Required parameters:
idThe ID of the variable to be deleted.
Response example:
{
    "result": "success"
}
ordprev Move Variable Order Previous
This action will move the order of the variable to the previous position in relation to other variables on your account. This is used primarily by the dashboard to sort the variables, but may also be used for your own implementations. If the variable is already the first in the list, the error error_order_first will be returned. This action cannot be requested if you lock your variables in your account settings.
Request example:
{
    "key": "l9VvtFztnilpPcfQ",
    "action": "ordprev",
    "id": "MzZE5Bwn"
}
Required parameters:
idThe ID of the variable to be moved.
Response example:
{
    "result": "success"
}
ordnext Move Variable Order Next
This action will move the order of the variable to the next position in relation to other variables on your account. This is used primarily by the dashboard to sort the variables, but may also be used for your own implementations. If the variable is already the last in the list, the error error_order_last will be returned. This action cannot be requested if you lock your variables in your account settings.
Request example:
{
    "key": "l9VvtFztnilpPcfQ",
    "action": "ordnext",
    "id": "MzZE5Bwn"
}
Required parameters:
idThe ID of the variable to be moved.
Response example:
{
    "result": "success"
}
list List All Variables
This action returns a list of all variables on someone's account associated with the passed key.
Request example:
{
    "key": "l9VvtFztnilpPcfQ",
    "action": "list"
}
Response example:
{
    "result": "success",
    "list": [
            "4OpGXF48",
            "wmPVzYn7",
            "uxSNejyi"
        ]
}
Parameters:
listAn array of variable IDs on the account.
read Read From Variable
This action returns the most recent value stored in a variable.
Request example:
{
    "key": "l9VvtFztnilpPcfQ",
    "action": "read",
    "id": "4OpGXF48"
}
Required parameters:
idThe ID of the variable to read from.
Response example:
{
    "result": "success",
    "value": 48,
    "time": 1485613580,
    "current": 1485613614
}
Parameters:
valueThe most recent value stored in the variable.timeThe time in seconds when the variable was last written to.currentThe time in seconds of calling this API request. You may use these last two parameters to calculate the age of the most recent value in the variable (age =current-time).
sread Simple Read From Variable
This action returns the most recent value stored in a variable. It is similar to the previous one, but it returns a simple string instead of a JSON payload. The action is thus more limited, but can be used in environments where parsing JSON is not viable.
Request example:
{
    "key": "l9VvtFztnilpPcfQ",
    "action": "sread",
    "id": "4OpGXF48"
}
Required parameters:
idThe ID of the variable to read from.
Response example:
success|48The returned value is stored after the | symbol.
history Read Variable History
This action returns an array of values stored in a varaible's history. This can be useful if you want to plot graphs using the data. Useful only if the expire parameter of the variable is set to something other than 0.
Request example:
{
    "key": "l9VvtFztnilpPcfQ",
    "action": "history",
    "id": "4OpGXF48"
}
Required parameters:
idThe ID of the variable to read the history from.
Response example:
{
    "result": "success",
    "history": [
            { "value": 48, "time": 1485613580 },
            { "value": 47, "time": 1485613520 },
            { "value": 46, "time": 1485613460 },
            { "value": 44, "time": 1485613400 }
        ],
    "current": 1485613614
}
Parameters:
historyThe array of values stored in variable's history.valueThe value of the variable at a certain point in time.timeThe time in seconds of every entry in the history.
currentThe time in seconds of calling this API request. You may use these last two parameters to calculate the age of every value in history (age =current-time).
write Write To Variable
This action writes a value to a variable. The value will automatically be added to the variable's history as well if the expire parameter of the variable is set to something other than 0.
Request example:
{
    "key": "l9VvtFztnilpPcfQ",
    "action": "write",
    "id": "4OpGXF48",
    "value": 50
}
Required parameters:
idThe ID of the variable to write the value to.valueValue to be written.
Response example:
{
    "result": "success"
}
swrite Simple Write To Variable
This action writes a value to a variable. It is similar to the previous one, but it returns a simple string instead of a JSON payload.
Request example:
{
    "key": "l9VvtFztnilpPcfQ",
    "action": "swrite",
    "id": "4OpGXF48",
    "value": 50
}
Required parameters:
idThe ID of the variable to write the value to.valueValue to be written.
Response example:
successtoggle Toggle Boolean Variable
This action works only with boolean variables and performs a toggling action while returning the new value after the toggle has been performed. Requesting it on a non-boolean variable will return an error as explained previously.
Request example:
{
    "key": "l9VvtFztnilpPcfQ",
    "action": "toggle",
    "id": "4OpGXF48"
}
Required parameters:
idThe ID of the variable to toggle.
Response example:
{
    "result": "success",
    "value": false,
    "time": 1485613580,
    "current": 1485613614
}
Parameters:
valueThe new boolean value stored in the variable after the toggle.timeThe time in seconds when the variable was last written to.currentThe time in seconds of calling this API request. You may use these last two parameters to calculate the age of the most recent value in the variable (age =current-time).
stoggle Simple Toggle Boolean Variable
This action works only with boolean variables and performs a toggling action while returning the new value after the toggle has been performed. Requesting it on a non-boolean variable will return an error as explained previously. It is similar to the previous one, but it returns a simple string instead of a JSON payload.
Request example:
{
    "key": "l9VvtFztnilpPcfQ",
    "action": "stoggle",
    "id": "4OpGXF48"
}
Required parameters:
idThe ID of the variable to toggle.
Response example:
success|falseThe new boolean value after the toggle is stored after the | symbol.
all Return All Data
This action returns all data stored on someone's account associated with the passed key. The data includes a list of all variables, along with the history of each.
Request example:
{
    "key": "l9VvtFztnilpPcfQ",
    "action": "all"
}
Response example:
{
    "result": "success",
    "list": [
        {
            "id": "4OpGXF48",
            "type": "int",
            "name": "Humidity",
            "description": "Humidity measured by the sensor.",
            "unit": "%",
            "graph": true,
            "perc": false,
            "min": 0,
            "max": 10,
            "expire": 86400,
            "cooldown": 60,
            "public": false,
            "history": [
                    { "value": 48, "time": 1485613580 },
                    { "value": 47, "time": 1485613520 },
                    { "value": 46, "time": 1485613460 },
                    { "value": 44, "time": 1485613400 }
                ]
        },
        {
            "id": "wmPVzYn7",
            "type": "string",
            "name": "Bulletin",
            "description": "Text shown on the LCD.",
            "unit": "",
            "graph": false,
            "perc": false,
            "min": 0,
            "max": 0,
            "expire": 0,
            "cooldown": 1,
            "public": false,
            "history": [
                    { "value": "VariPass is awesome!", "time": 1485013820 }
                ]
        },
        {
            "id": "uxSNejyi",
            "type": "bool",
            "name": "Light Toggle",
            "description": "Toggle for the light in the room.",
            "unit": "",
            "graph": true,
            "perc": false,
            "min": 0,
            "max": 0,
            "expire": 3600,
            "cooldown": 60,
            "public": true,
            "history": [
                    { "value": false, "time": 1485613572 },
                    { "value": true, "time": 1485613414 },
                    { "value": false, "time": 1485613159 },
                    { "value": true, "time": 1485612277 },
                    { "value": false, "time": 1485610180 },
                ]
        }
    ],
    "current": 1485613614
}
The response is made up of three different actions: list, info and history. Considering that the response parameters in those actions are identical to these, there is no need to explain them in detail. Please refer to those actions instead.
latest Return Latest Data
This action returns only the latest data stored on someone's account associated with the passed key. The data includes a list of all variables, and their corresponding latest values and times.
Request example:
{
    "key": "l9VvtFztnilpPcfQ",
    "action": "latest"
}
Response example:
{
    "result": "success",
    "list": [
        {
            "id": "4OpGXF48",
            "value": 48,
            "time": 1485613580
        },
        {
            "id": "wmPVzYn7",
            "value": "VariPass is awesome!",
            "time": 1485013820
        },
        {
            "id": "uxSNejyi",
            "value": false,
            "time": 1485613572
        }
    ],
    "current": 1485613614
}
The response is similar to that of all action, but omits a lot of details and only returns the latest values for all variables. It is designed to be used with applications which need to periodically read all the data, but are not interested in history values or variable information like names or descriptions.
slatest Simple Return Latest Data
Like the previous action, this action returns only the latest data stored on someone's account, but stores the data in a simplified string format instead of a JSON payload. This action is more limited than the previous one but can be used in environments where parsing JSON is not viable.
Request example:
{
    "key": "l9VvtFztnilpPcfQ",
    "action": "slatest"
}
Response example:
success|3|4OpGXF48|48|wmPVzYn7|VariPass is awesome!|uxSNejyi|false|The returned parameters and values are not named, but are separated using the | symbol and follow a similar pattern each time. The first parameter specifies the result of the action, while the second parameter specifies the number of returned variables. This number can then be used to parse the rest of the data, which is stored as such: id|value| repeating for each variable with no spaces or anything else.
transfer Transfer Variable Ownership
This action will transfer a variable from the account associated with the passed API key, to the account associated with the targeted email address. This action is irreversible, unless the new owner transfers it back. Note that the target account has to enable transfers in their account settings. This action cannot be requested if you lock your variables in your account settings.
Request example:
{
    "key": "l9VvtFztnilpPcfQ",
    "action": "transfer",
    "id": "wmPVzYn7",
    "target": "new.owner@varipass.org"
}
Required parameters:
idThe ID of the variable to be transfered.targetEmail associated with the targeted account.
Response example:
{
    "result": "success"
}
graph Render Variable Graph
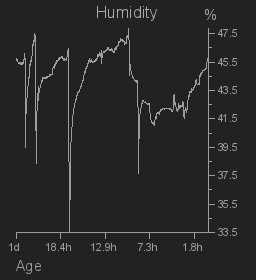
This action will return a rendered graph of a requested variable as a PNG image. In case there is an error, it will return a classic JSON response. Note that this action may not be used on variables of string type, and will result in error_is_string error.
Omitting most parameters will result in a standard design similar to the one found on the Dashboard (not entirely exact however), but the graph may be customized. Please check below for details. NOTE: The color parameters should not be prefixed with #.
Request example:
{
    "key": "l9VvtFztnilpPcfQ",
    "action": "graph",
    "id": "4OpGXF48",
    "eink": false,
    "thick": false,
    "format": "png",
    "title": true,
    "width": 256,
    "height": 280,
    "color_line": "9d9d9d",
    "color_background": "222222",
    "color_title": "aaaaaa",
    "color_axes": "9d9d9d"
}
Required parameters:
idThe ID of the variable.
Optional parameters (NOTE: All values shown in the example above are the default values):
einkSetting this to true will format the image to be better compatible with e-ink displays. Namely, the returned image will be in BMP format with 1 bit depth (monochrome), background will be white, all graphics will be black and a bitmap font will be used.thickSetting this to true will make the graph appear thicker. Bold font will be used and all lines will use a thickness of 2 instead of 1. This option is useful for displaying large graphs on e-ink displays.formatThe image format to use. Possible options arepng,jpg(orjpeg),giforbmp.titleWhether the title should be shown.widthWidth of the whole image.heightHeight of the whole image.color_lineColor of the graph's value line.color_backgroundColor of the background of whole image.color_titleColor of the title text.color_axesColor of the X and Y axes (lines, ticks and labels).
Response example with no optional parameters:
Response example after changing optional parameters (as listed below the image):
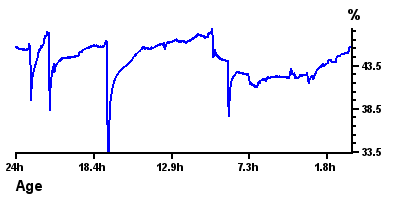
"thick": true,
"title": false,
"width": 400,
"height": 200,
"color_line": "0000ff",
"color_background": "ffffff"
"color_axes": "000000"
Response example after setting eink parameter to true:
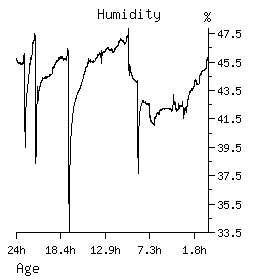
"eink": truesgraph Simple Render Variable Graph
Like the previous action, this action renders a graph of a variable. However, in case of an error, it returns a simple string instead of a JSON payload.
Request example:
{
    "key": "l9VvtFztnilpPcfQ",
    "action": "sgraph",
    "id": "wrongid"
}
Response example:
error_invalid_idExample API Client
Building an API client is extremely easy. Below is an example code for a JavaScript client which returns the value of a certain variable from the API. The client uses an XMLHttpRequest object to create a payload and then send it. Upon receiving, it parses the input to a native object and does something with the returned value. In this case, the client will simply write the output to the console.
// Set URL to the API server.
var url = "https://api.varipass.org";

// Prepare the payload.
var payload = {
        "key": "l9VvtFztnilpPcfQ",
        "action": "read",
        "id": "MzZE5Bwn"
    };

// Create a new XMLHttpRequest.
var xhr = new XMLHttpRequest();

// Prepare parameters for POST with JSON.
xhr.open("POST", url, true);
xhr.setRequestHeader("Content-type", "application/json");

// Handle receiving of response.
xhr.onreadystatechange = function () {
    if (xhr.readyState == 4 && xhr.status == 200) {
        // Parse the response to a usable object.
        var response = JSON.parse(xhr.responseText);

        /*
        Do something with the data.
        Here we are just printing the value to console.
        */
        console.log(response.value);
    }
}

// Send the payload.
xhr.send(JSON.stringify(payload));
WebSocket Server
WebSocket server URL:
wss://api.varipass.org:443/wsWebSocket Server
In addition to the API, we also run a WebSocket server which you can use to receive alerts whether a variable has been updated on your account. The URL and port of our server is shown above and uses WSS (Secure WebSockets). This can be highly useful as it eleminates the need to constantly send actions to our API. Send them only when you need to instead! The API actions that send a refresh notification through the WebSocket are: create, edit, destroy, write, swrite and transfer.
The WebSocket server is based around athenticating, and then exchanging different messages. Below is the list of messages currently used along with their responses.
Messages
key <key>Sent by the client to the server to authenticate itself. Be sure to replace the<key>part with the actual API key! The server will respond withok.pingSent by the client to the server to keep the connection alive. We suggest resending this every 10 seconds. The server will respond withpong.refreshSent by the server to the client to notify it of changes to the variables on the account. Note that no actual data is transmitted, you still need to request an API action of choice to read the data from our API server.
Example WebSocket Client
Building a WebSocket client that will interract with our server is also easy. Below is an example JavaScript code for a WebSocket client that will connect to our server, keep the connection alive, and do something every time the refresh message is received. In case of a diconnect, the client will also attempt to reconnect.
// Set URL to the WebSocket server.
var url = "wss://api.varipass.org:443/ws";
// Set your API key.
var key = "l9VvtFztnilpPcfQ";

// Used to control the ping timeouts.
var timeoutPing;

// Creates a new WebSocket and manages it.
function wsStart() {
    // Create the WebSocket connection.
    socket = new WebSocket(url);

    // Handle the opening of the socket.
    socket.onopen = function(event) {
        socket.send("key " + key);
    };

    // Handle the disconnect of the socket.
    socket.onclose = function(event) {
        window.clearTimeout(timeoutPing);
        window.setTimeout(function() {
            wsStart();
        }, 1000);
    };

    // Handle messages sent by the server.
    socket.onmessage = function(event) {
        var message = event.data;

        if (message == "ok") {
            timeoutPing = setTimeout(wsPing, 10000);
        }
        else if (message == "pong") {
            timeoutPing = setTimeout(wsPing, 10000);
        }
        else if (message == "refresh") {

            /*
            Handle the API refresh call here.
            Use API actions "read", "sread", "history" or "all".
            Here we are just printing the message to console.
            */
            console.log(message);
        }

    };

    // Handle any errors that occur.
    socket.onerror = function(error) {
        console.log("WebSocket Error. " + error);
    };
}

// Sends a ping message to the server.
function wsPing() {
    socket.send("ping");
}

// Start the client.
wsStart();
Demo API Client
You need to sign in before you can use the demo API client. You may sign in here.